

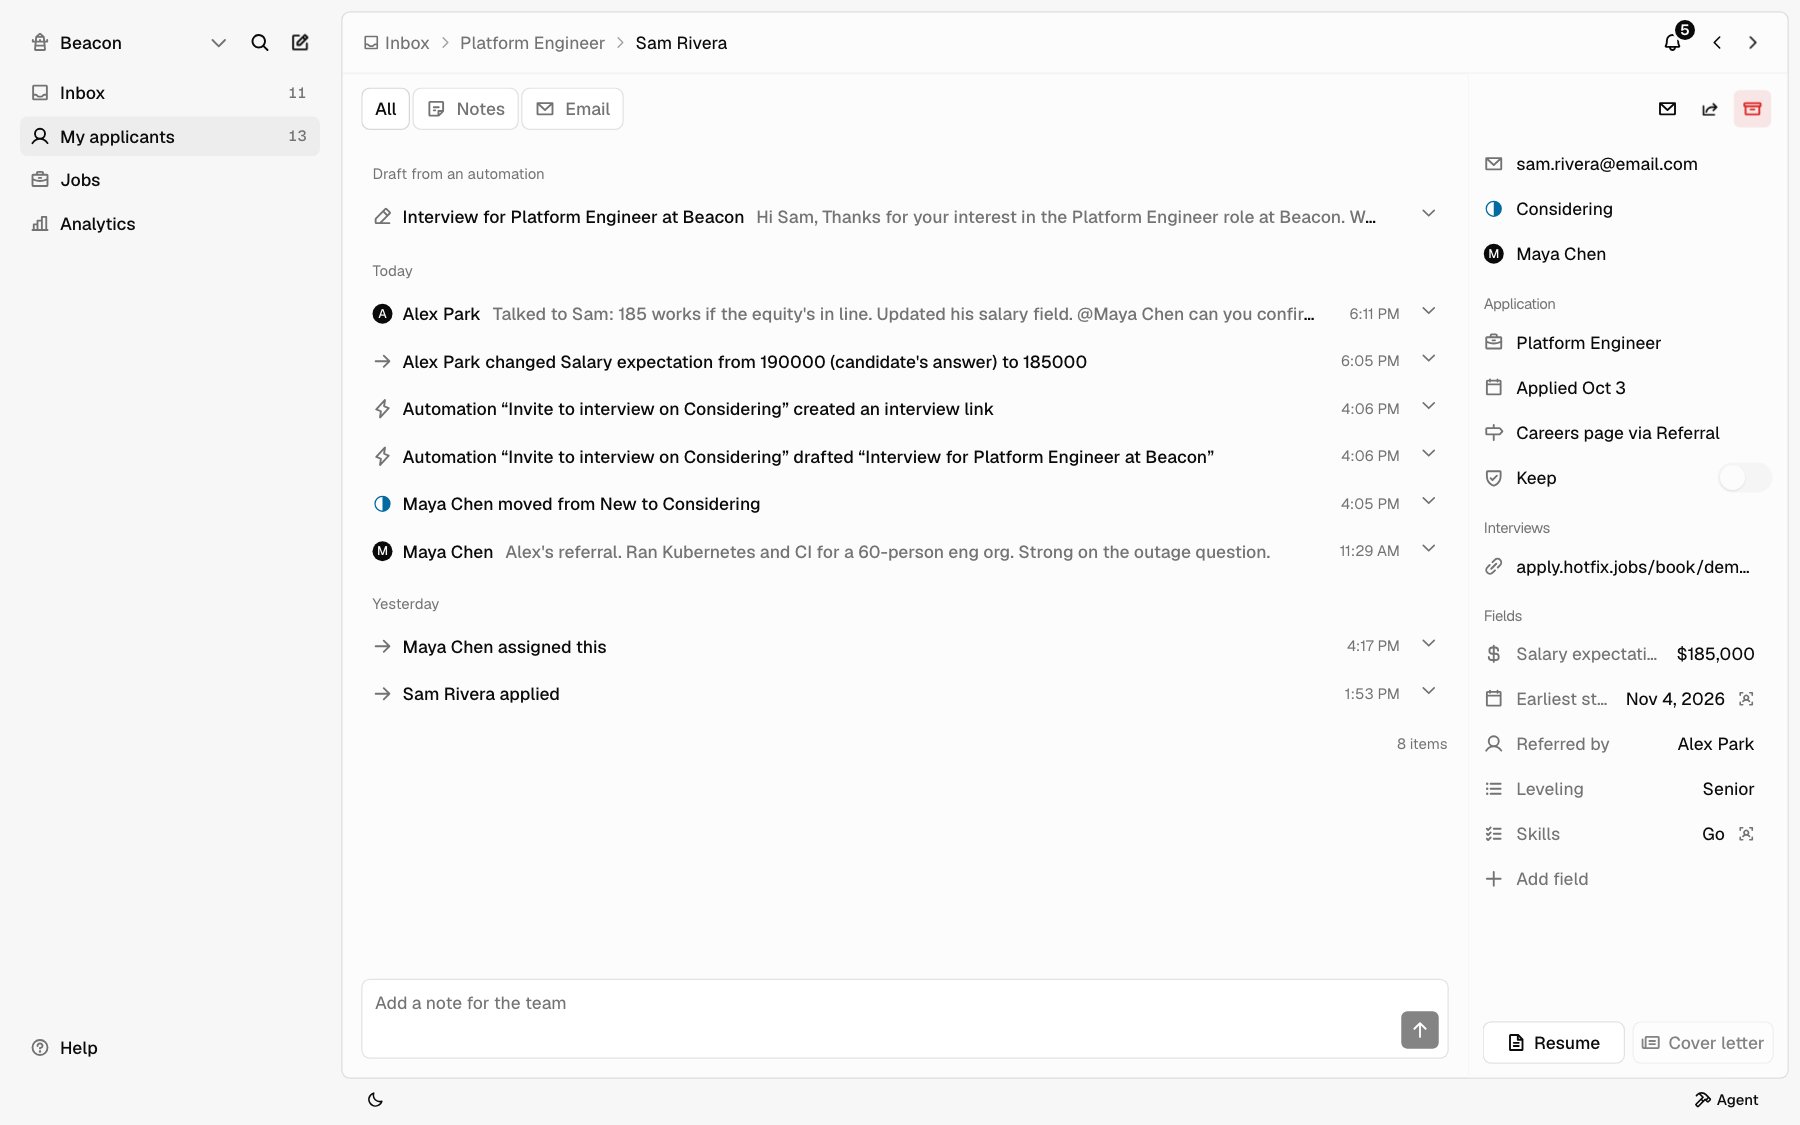
The details panel
From top to bottom, the panel shows the items below. Hover any line to see what it is. Lines you can click highlight when you hover them.Read the resume and cover letter
Click Resume at the bottom of the details panel. The resume opens in a panel beside the record. Click Cover letter to read the cover letter the same way.Where they came from
The source line tells you where they applied:- Careers page means they applied on your careers page, hosted or embedded on your site.
- Hotfix search means they found the job on Hotfix.
Custom fields
The Fields section shows each custom field that has a value on this application. Your company sets up its fields under Settings > Fields. To fill in an empty field, click Add field and pick it. To change a value, click the field.
A small person icon next to a value means it’s still the applicant’s own answer from the apply form. If your team changed it, the field shows what the applicant originally answered.
Every change to a field is logged in the activity feed.
The activity feed
The feed lists everything that happened on this application, newest first, grouped by day. Click a row to see its details. Use the tabs at the top to narrow it:Notes
Notes are for your team. The applicant never sees them, and adding one doesn’t send email.Add a note
Type in the Add a note for the team box at the bottom of the feed. Click the arrow button, or press Cmd+Enter (Ctrl+Enter on Windows), to add it. You can also add a note from the Inbox list. Click ⋯ on the row and pick Add note. Notes support Markdown, so you can use bold, lists, and links.Mention a teammate
Type @ in the note box and pick a teammate from the list. Keep typing to narrow it down, then press Enter or click their name. The note shows them as @Name. When you add the note, each teammate you mention gets a notification with your name, like Maya Chen mentioned you, and the start of the note under it. Clicking it opens this applicant on their notes. You can mention anyone on your team, even if the job has a hiring team.- You don’t get a notification for mentioning yourself.
- Editing a note notifies only teammates you newly mention, so fixing a typo doesn’t notify anyone again.
- Deleting a note doesn’t take back notifications it already sent.
Edit or delete a note
You can edit or delete only your own notes.1
Open the note
Click the note in the feed to expand it.
2
Edit or delete
Click the pencil to edit it, then Save. Or click the trash can, then
Delete to confirm.
Email an applicant
Email sends from your own Google account, so you need Google Workspace connected under Settings > Integrations. Until it is, the email panel shows Connect Google Workspace instead. See Integrations.1
Open a new email
Click the Email icon at the top of the details panel. From the Inbox list, you can also click ⋯ on a row and pick Email.
2
Pick a template, if you want one
Choose from Template to fill in the subject and body. Picking a template replaces what you typed. Your company manages templates under Settings > Templates.
3
Check From and To
From is your email. To is the applicant’s. You can’t change either.
4
Write the subject and body
Fill in Subject and Body. Your signature is added below the body when the email sends. To change it, click Edit under the body, or go to Settings > Preferences.
5
Send or schedule
Click Send to send now. Or click Schedule…, pick a time under Send at, and click Schedule.
Change a scheduled email
A scheduled email shows at the top of the feed with the time it sends. Expand it and:- Click Edit to open it. Then click Send now, Change time, or Cancel schedule. Edits save to the scheduled email.
- Click Cancel to stop it from sending.
Drafts from automations
An automation, the Agent, or an app connected over MCP can leave an email draft on a record for you to review. It shows at the top of the feed as a draft and isn’t sent. Expand it and click Edit to review and send it, or Discard to delete it.Reply to an email
1
Open the thread
Click the Email tab, then click the email to expand the thread.
2
Write your reply
Type in the Write a reply box below the messages.
3
Send
Click Reply, or press Cmd+Enter (Ctrl+Enter on Windows).
Reject an applicant
1
Pick Rejected
Click Status in the details panel and pick Rejected. The Reject
dialog opens.
2
Choose whether to email them
Leave Send rejection email on to send one, or turn it off to reject
without email.
3
Pick the template and when it sends
Choose the template. Then choose when it sends: In an hour, Next
business day (the default), or In 3 business days. Business days skip
Saturday and Sunday.
4
Reject
Click Reject.
The email waits so you can change your mind. Moving the application out of
Rejected before it sends cancels the email. Right after you reject one
applicant, click Undo on the message that appears to put the application
back where it was.
Related
- Inbox
- Interviews
- Offers
- Integrations
- Applications for the same actions over the API and MCP