> ## Documentation Index
> Fetch the complete documentation index at: https://docs.hotfix.jobs/llms.txt
> Use this file to discover all available pages before exploring further.
> ## Agent Instructions
> Product noun is jobs.
> MCP at https://rest.hotfix.jobs/mcp is the hiring contract for agents. Clients sign in with Hotfix; API keys are for HTTP only.
> Do not invent unpublished REST or hiring stats. Webhooks are set up in the app; there is no REST route or MCP tool to manage them.
> Do not mention Greenhouse, Ashby, Quick Apply, or claim.
> Creating a draft, offer, or booking link does not send email.
# Candidate record
> Open an applicant to read their resume, track activity, write notes, email them, and reject them.
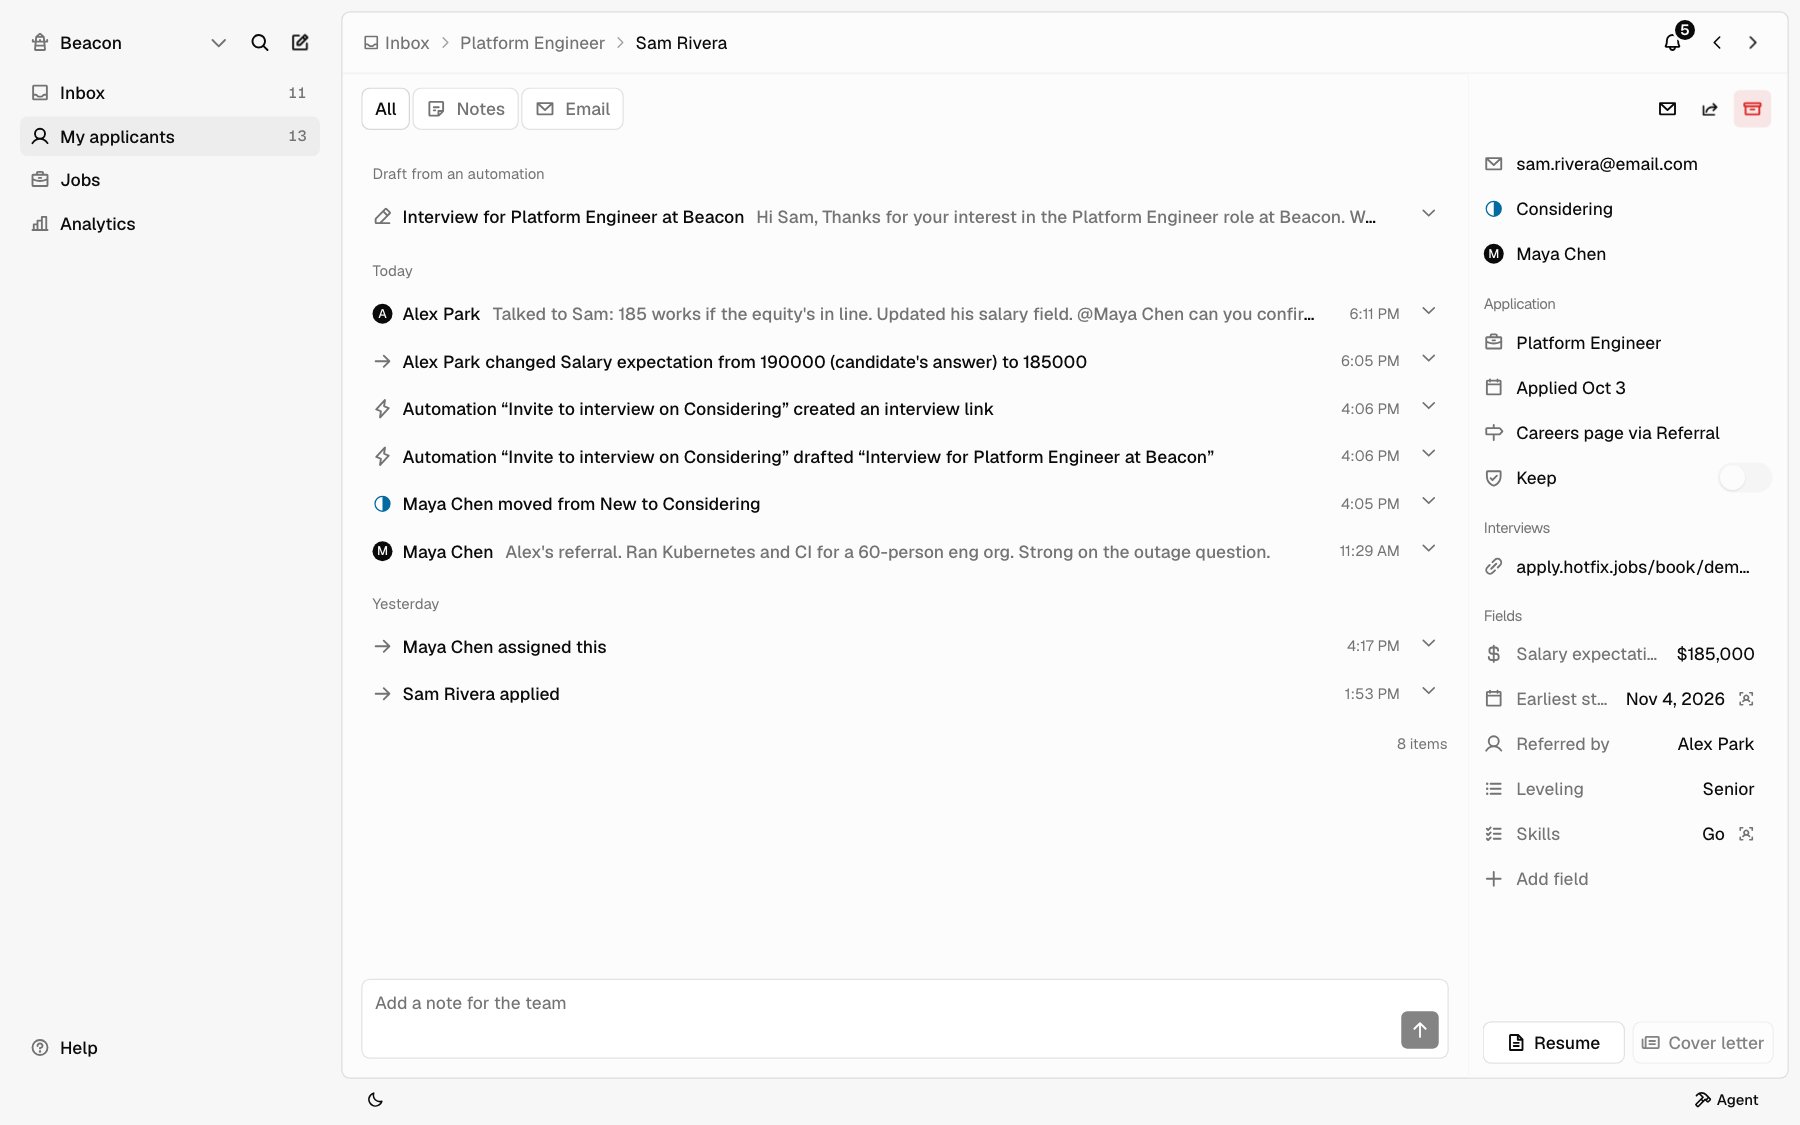
Click any row in the [Inbox](/help/inbox) to open that applicant's record. The activity feed fills the middle. The details panel sits on the right. On a smaller screen, click **Details** to open it.
Use the arrows at the top to move to the previous or next applicant in your list. Click **Inbox** at the top to go back to the list.
 ## The details panel
From top to bottom, the panel shows the items below. Hover any line to see what it is. Lines you can click highlight when you hover them.
| Item | What it does |
| - | - |
| Email, Share, Archive | Icons at the top. **Email** opens a new email. **Share application** copies a link to this record for a teammate. **Archive** archives it, or **Restore** brings it back. |
| Contact details | Email, plus phone, website, LinkedIn, and GitHub when they gave them. Hover a line to copy it. |
| Status | Click to change it. See [Statuses](/help/inbox#statuses). |
| Assignee | Click to pick the teammate who owns this application. |
| **Application** | The job they applied to (click it to open the job), when they applied, and where. See [Where they came from](#where-they-came-from). **Keep** holds the application back from your company's [data retention](/help/privacy#keep-an-application). When they applied to more than one of your jobs, each other application is listed with its status. Click one to open it. |
| **Interviews** | Each upcoming interview and open booking link. Click one for its actions. Each ended interview has a feedback line with the panel's marks; **Due** means you owe yours. See [Interviews](/help/interviews) and [Interview feedback](/help/feedback). |
| **Offer** | The offer, when there is one. Click it for its actions. See [Offers](/help/offers). |
| **Fields** | Your company's custom fields. See [Custom fields](#custom-fields). |
| **Resume** and **Cover letter** | Buttons at the bottom. A button is grayed out when they didn't send one. |
## Read the resume and cover letter
Click **Resume** at the bottom of the details panel. The resume opens in a panel beside the record.
Click **Cover letter** to read the cover letter the same way.
## Where they came from
The source line tells you where they applied:
* **Careers page** means they applied on your [careers page](/careers-page), hosted or embedded on your site.
* **Hotfix search** means they found the job on Hotfix.
If they followed a tagged link, the tag follows, like **Careers page via LinkedIn**. To tag your own links, see [Where they came from](/applications#where-they-came-from).
## Custom fields
The **Fields** section shows each custom field that has a value on this application. Your company sets up its fields under **Settings** > **Fields**.
To fill in an empty field, click **Add field** and pick it. To change a value, click the field.
| Field type | How to edit |
| - | - |
| Text, number, or currency | Type the value. Press Enter or click away to save. Press Escape to cancel. |
| Date | Pick a day on the calendar. Click **Clear** to empty it. |
| Yes / no, Select, or Team member | Pick an option from the menu. Pick **Empty** to clear it. |
A small person icon next to a value means it's still the applicant's own answer from the apply form. If your team changed it, the field shows what the applicant originally answered.
Every change to a field is logged in the activity feed.
## The activity feed
The feed lists everything that happened on this application, newest first, grouped by day. Click a row to see its details.
Use the tabs at the top to narrow it:
| Tab | Shows |
| - | - |
| All | Status changes, notes, email, and everything else. |
| Notes | Only notes from your team. |
| Email | Only email you sent, and their replies. |
## Notes
Notes are for your team. The applicant never sees them, and adding one doesn't send email.
### Add a note
Type in the **Add a note for the team** box at the bottom of the feed. Click the arrow button, or press Cmd+Enter (Ctrl+Enter on Windows), to add it.
You can also add a note from the Inbox list. Click **⋯** on the row and pick **Add note**.
Notes support Markdown, so you can use bold, lists, and links.
### Mention a teammate
Type **@** in the note box and pick a teammate from the list. Keep typing to narrow it down, then press Enter or click their name. The note shows them as **@Name**.
When you add the note, each teammate you mention gets a notification with your name, like **Maya Chen mentioned you**, and the start of the note under it. Clicking it opens this applicant on their notes. You can mention anyone on your team, even if the job has a [hiring team](/help/post-a-job#hiring-team).
* You don't get a notification for mentioning yourself.
* Editing a note notifies only teammates you newly mention, so fixing a typo doesn't notify anyone again.
* Deleting a note doesn't take back notifications it already sent.
### Edit or delete a note
You can edit or delete only your own notes.
Click the note in the feed to expand it.
Click the pencil to edit it, then **Save**. Or click the trash can, then
**Delete** to confirm.
An edited note shows **edited** next to its time. A deleted note is removed for your whole team.
## Email an applicant
Email sends from your own Google account, so you need Google Workspace connected under **Settings** > **Integrations**. Until it is, the email panel shows **Connect Google Workspace** instead. See [Integrations](/help/integrations).
Click the **Email** icon at the top of the details panel. From the Inbox list, you can also click **⋯** on a row and pick **Email**.
Choose from **Template** to fill in the subject and body. Picking a template replaces what you typed. Your company manages templates under **Settings** > **Templates**.
**From** is your email. **To** is the applicant's. You can't change either.
Fill in **Subject** and **Body**. Your signature is added below the body when the email sends. To change it, click **Edit** under the body, or go to **Settings** > **Preferences**.
Click **Send** to send now. Or click **Schedule…**, pick a time under **Send at**, and click **Schedule**.
After you send, the email shows at the top of the feed as **Sending…** until it goes out. If it doesn't send, it stays there marked **Didn't send** with the reason. Expand it to **Retry**, **Edit**, or **Dismiss** it.
### Change a scheduled email
A scheduled email shows at the top of the feed with the time it sends. Expand it and:
* Click **Edit** to open it. Then click **Send now**, **Change time**, or **Cancel schedule**. Edits save to the scheduled email.
* Click **Cancel** to stop it from sending.
### Drafts from automations
An [automation](/automations), the Agent, or an app connected over MCP can leave an email draft on a record for you to review. It shows at the top of the feed as a draft and isn't sent. Expand it and click **Edit** to review and send it, or **Discard** to delete it.
## Reply to an email
Click the **Email** tab, then click the email to expand the thread.
Type in the **Write a reply** box below the messages.
Click **Reply**, or press Cmd+Enter (Ctrl+Enter on Windows).
Your reply goes out in the same thread, with your signature.
## Reject an applicant
Click **Status** in the details panel and pick **Rejected**. The **Reject**
dialog opens.
Leave **Send rejection email** on to send one, or turn it off to reject
without email.
Choose the template. Then choose when it sends: **In an hour**, **Next
business day** (the default), or **In 3 business days**. Business days skip
Saturday and Sunday.
Click **Reject**.
Rejecting moves the application to **Archived**. The rejection email sends from your Google account at the time you picked.
The email waits so you can change your mind. Moving the application out of
**Rejected** before it sends cancels the email. Right after you reject one
applicant, click **Undo** on the message that appears to put the application
back where it was.
If Google Workspace isn't connected, **Send rejection email** is off and no email is sent. If an automation already emails rejected applicants for this job, the dialog doesn't offer a second email.
To reject many applicants at once, select them in the [Inbox](/help/inbox#change-many-at-once) and pick **Status** > **Rejected**. The same dialog opens. Applicants who were already rejected don't get another email.
## Related
* [Inbox](/help/inbox)
* [Interviews](/help/interviews)
* [Offers](/help/offers)
* [Integrations](/help/integrations)
* [Applications](/applications) for the same actions over the API and MCP
This documentation is built and hosted on [Mintlify](https://mintlify.com), a developer documentation platform.
## The details panel
From top to bottom, the panel shows the items below. Hover any line to see what it is. Lines you can click highlight when you hover them.
| Item | What it does |
| - | - |
| Email, Share, Archive | Icons at the top. **Email** opens a new email. **Share application** copies a link to this record for a teammate. **Archive** archives it, or **Restore** brings it back. |
| Contact details | Email, plus phone, website, LinkedIn, and GitHub when they gave them. Hover a line to copy it. |
| Status | Click to change it. See [Statuses](/help/inbox#statuses). |
| Assignee | Click to pick the teammate who owns this application. |
| **Application** | The job they applied to (click it to open the job), when they applied, and where. See [Where they came from](#where-they-came-from). **Keep** holds the application back from your company's [data retention](/help/privacy#keep-an-application). When they applied to more than one of your jobs, each other application is listed with its status. Click one to open it. |
| **Interviews** | Each upcoming interview and open booking link. Click one for its actions. Each ended interview has a feedback line with the panel's marks; **Due** means you owe yours. See [Interviews](/help/interviews) and [Interview feedback](/help/feedback). |
| **Offer** | The offer, when there is one. Click it for its actions. See [Offers](/help/offers). |
| **Fields** | Your company's custom fields. See [Custom fields](#custom-fields). |
| **Resume** and **Cover letter** | Buttons at the bottom. A button is grayed out when they didn't send one. |
## Read the resume and cover letter
Click **Resume** at the bottom of the details panel. The resume opens in a panel beside the record.
Click **Cover letter** to read the cover letter the same way.
## Where they came from
The source line tells you where they applied:
* **Careers page** means they applied on your [careers page](/careers-page), hosted or embedded on your site.
* **Hotfix search** means they found the job on Hotfix.
If they followed a tagged link, the tag follows, like **Careers page via LinkedIn**. To tag your own links, see [Where they came from](/applications#where-they-came-from).
## Custom fields
The **Fields** section shows each custom field that has a value on this application. Your company sets up its fields under **Settings** > **Fields**.
To fill in an empty field, click **Add field** and pick it. To change a value, click the field.
| Field type | How to edit |
| - | - |
| Text, number, or currency | Type the value. Press Enter or click away to save. Press Escape to cancel. |
| Date | Pick a day on the calendar. Click **Clear** to empty it. |
| Yes / no, Select, or Team member | Pick an option from the menu. Pick **Empty** to clear it. |
A small person icon next to a value means it's still the applicant's own answer from the apply form. If your team changed it, the field shows what the applicant originally answered.
Every change to a field is logged in the activity feed.
## The activity feed
The feed lists everything that happened on this application, newest first, grouped by day. Click a row to see its details.
Use the tabs at the top to narrow it:
| Tab | Shows |
| - | - |
| All | Status changes, notes, email, and everything else. |
| Notes | Only notes from your team. |
| Email | Only email you sent, and their replies. |
## Notes
Notes are for your team. The applicant never sees them, and adding one doesn't send email.
### Add a note
Type in the **Add a note for the team** box at the bottom of the feed. Click the arrow button, or press Cmd+Enter (Ctrl+Enter on Windows), to add it.
You can also add a note from the Inbox list. Click **⋯** on the row and pick **Add note**.
Notes support Markdown, so you can use bold, lists, and links.
### Mention a teammate
Type **@** in the note box and pick a teammate from the list. Keep typing to narrow it down, then press Enter or click their name. The note shows them as **@Name**.
When you add the note, each teammate you mention gets a notification with your name, like **Maya Chen mentioned you**, and the start of the note under it. Clicking it opens this applicant on their notes. You can mention anyone on your team, even if the job has a [hiring team](/help/post-a-job#hiring-team).
* You don't get a notification for mentioning yourself.
* Editing a note notifies only teammates you newly mention, so fixing a typo doesn't notify anyone again.
* Deleting a note doesn't take back notifications it already sent.
### Edit or delete a note
You can edit or delete only your own notes.
Click the note in the feed to expand it.
Click the pencil to edit it, then **Save**. Or click the trash can, then
**Delete** to confirm.
An edited note shows **edited** next to its time. A deleted note is removed for your whole team.
## Email an applicant
Email sends from your own Google account, so you need Google Workspace connected under **Settings** > **Integrations**. Until it is, the email panel shows **Connect Google Workspace** instead. See [Integrations](/help/integrations).
Click the **Email** icon at the top of the details panel. From the Inbox list, you can also click **⋯** on a row and pick **Email**.
Choose from **Template** to fill in the subject and body. Picking a template replaces what you typed. Your company manages templates under **Settings** > **Templates**.
**From** is your email. **To** is the applicant's. You can't change either.
Fill in **Subject** and **Body**. Your signature is added below the body when the email sends. To change it, click **Edit** under the body, or go to **Settings** > **Preferences**.
Click **Send** to send now. Or click **Schedule…**, pick a time under **Send at**, and click **Schedule**.
After you send, the email shows at the top of the feed as **Sending…** until it goes out. If it doesn't send, it stays there marked **Didn't send** with the reason. Expand it to **Retry**, **Edit**, or **Dismiss** it.
### Change a scheduled email
A scheduled email shows at the top of the feed with the time it sends. Expand it and:
* Click **Edit** to open it. Then click **Send now**, **Change time**, or **Cancel schedule**. Edits save to the scheduled email.
* Click **Cancel** to stop it from sending.
### Drafts from automations
An [automation](/automations), the Agent, or an app connected over MCP can leave an email draft on a record for you to review. It shows at the top of the feed as a draft and isn't sent. Expand it and click **Edit** to review and send it, or **Discard** to delete it.
## Reply to an email
Click the **Email** tab, then click the email to expand the thread.
Type in the **Write a reply** box below the messages.
Click **Reply**, or press Cmd+Enter (Ctrl+Enter on Windows).
Your reply goes out in the same thread, with your signature.
## Reject an applicant
Click **Status** in the details panel and pick **Rejected**. The **Reject**
dialog opens.
Leave **Send rejection email** on to send one, or turn it off to reject
without email.
Choose the template. Then choose when it sends: **In an hour**, **Next
business day** (the default), or **In 3 business days**. Business days skip
Saturday and Sunday.
Click **Reject**.
Rejecting moves the application to **Archived**. The rejection email sends from your Google account at the time you picked.
The email waits so you can change your mind. Moving the application out of
**Rejected** before it sends cancels the email. Right after you reject one
applicant, click **Undo** on the message that appears to put the application
back where it was.
If Google Workspace isn't connected, **Send rejection email** is off and no email is sent. If an automation already emails rejected applicants for this job, the dialog doesn't offer a second email.
To reject many applicants at once, select them in the [Inbox](/help/inbox#change-many-at-once) and pick **Status** > **Rejected**. The same dialog opens. Applicants who were already rejected don't get another email.
## Related
* [Inbox](/help/inbox)
* [Interviews](/help/interviews)
* [Offers](/help/offers)
* [Integrations](/help/integrations)
* [Applications](/applications) for the same actions over the API and MCP
This documentation is built and hosted on [Mintlify](https://mintlify.com), a developer documentation platform.